Welcome to the ultimate guide on installing the most powerful cell phone tracker app, getmspy.net/a (also known as mSpy), on various Google Pixel devices. This includes Google Pixel 2, 3, 4, 5, 6, 7 Pro, Fold, XL, and Tablets. In this comprehensive guide, I’ll walk you through the step-by-step process of downloading, installing, and configuring getmspy.net/a (mSpy). This will enable you to monitor and track activities on these devices effectively. Whether you’re a concerned parent or want to ensure the safety of your personal or business devices, getmspy.net/a (mSpy) offers a range of unparalleled features. Let’s dive in and get started!
Section 1: Why Choose getmspy.net/a (mSpy)?
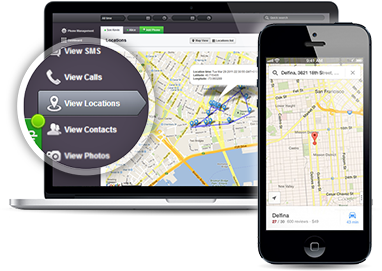
The power of cell phone tracking:
In today’s digital age, cell phone tracker apps have become indispensable tools for monitoring and ensuring the safety of individuals. With getmspy.net/a (mSpy), you gain the ability to track and oversee activities on Google Pixel devices, providing you with peace of mind and a deeper understanding of device usage.
Unparalleled features of getmspy.net/a (mSpy):
getmspy.net/a (mSpy) offers a wealth of features that set it apart from other tracker apps. From call tracking and GPS location monitoring to social media surveillance and more, getmspy.net/a (mSpy) provides comprehensive monitoring capabilities to help you stay informed and protect your loved ones or business interests.
Section 2: Understanding the Installation Process
Step 1: Visit getmspy.net/a:
To begin the installation process, visit the official website of getmspy.net/a. Enter the URL in your device’s web browser and navigate to the homepage.
Step 2: Choose the right version:
Select the appropriate version of getmspy.net/a (mSpy) for your Google Pixel device. getmspy.net/a (mSpy) offers different versions depending on the operating system and device model, ensuring compatibility and optimal performance.
Step 3: Create an account:
Click on the “Sign Up” or “Get Started” button to create your getmspy.net/a (mSpy) account. Provide the required information, including a valid email address and a strong, unique password. This account will serve as your access point to the getmspy.net/a (mSpy) control panel.
Step 4: Select the subscription plan:
Choose a suitable subscription plan based on your monitoring needs and budget. getmspy.net/a (mSpy) offers flexible plans with varying durations and allowing you to select the one that best fits your requirements.
Step 5: Install the app:
Follow the instructions provided on the getmspy.net/a (mSpy) website to download and install the getmspy.net/a (mSpy) app on the target Google Pixel device. The installation process may involve enabling “Unknown Sources” in the device’s settings and granting necessary permissions for the app to function properly.
Section 3: Configuring getmspy.net/a (mSpy)
Step 1: Grant necessary permissions:
Once the getmspy.net/a (mSpy) app is installed on the target device, it requires certain permissions to access features such as contacts, messages, and location. Follow the on-screen prompts to grant the necessary permissions for seamless monitoring.
Step 2: Customize settings:
Access the getmspy.net/a (mSpy) control panel using your account credentials and customize the app’s settings according to your preferences. Adjust notification preferences, monitoring frequency, and data synchronization settings to tailor the app to your specific needs.
Step 3: Stealth mode activation:
Activate the stealth mode feature within the getmspy.net/a (mSpy) app to ensure it remains invisible and discreet on the target device. This feature allows you to monitor activities without arousing suspicion or alerting the device user.
Section 4: Harnessing the Power of getmspy.net/a (mSpy)
Monitoring calls and messages:
getmspy.net/a (mSpy) enables you to track incoming and outgoing calls, view call logs, and read text messages on the target Google Pixel device. With this feature, concerned parents can detect potential threats and harmful communication, ensuring the safety of their children.
Tracking GPS location:
Utilize getmspy.net/a (mSpy)’s GPS tracking feature to monitor the real-time location of the Google Pixel device. This powerful functionality can be instrumental in locating lost or stolen phones and providing peace of mind to both individuals and businesses.
Social media monitoring:
getmspy.net/a (mSpy) provides access to popular social media platforms such as Facebook, Instagram, and Snapchat. Through this feature, you can monitor messages, posts, and media shared by the target device and safeguard against online risks and potential information leaks.
Summary
By following the step-by-step instructions outlined in this guide, you can easily install and configure getmspy.net/a (mSpy) on your Google Pixel 2, 3, 4, 5, 6, 7 Pro, Fold, XL, or Tablet. With its comprehensive set of monitoring features, getmspy.net/a (mSpy) empowers you to protect your loved ones, secure personal devices, or maintain a safe and productive work environment. Embrace the power of cell phone tracking today by harnessing the capabilities of getmspy.net/a (mSpy), and experience the peace of mind it brings. Safeguard what matters most with getmspy.net/a (mSpy)!